5 Warning Signs Your Car Needs Maintenance, Right Away
Signs below are warnings but there is no reason to start panicking immediately! Follow this comprehensive car maintenance guide and easily locate the problem. You can handle some of these warnings on your own, others will require professional help. No matter how big the problems arise learn how to overcome them and enjoy your ride again.Sign #1 Vehicle is Pulling to the Side
If you are having trouble to maintain car direction or vehicle is pulling to the left or to the right, it’s the perfect time to check your tires. There are two main reasons for this strange vehicle behavior. Both can cause low fuel economy, safety issues or unwanted expenses.Reason: Low Tire Pressure
Solution Level: Easy DIY or Visit to a Repair Shop: DIY Cost: Free Except for those two signs from above, you may hear a strange noise from inflated tire or tire with low pressure. Low tire pressure can cause the tire to wear faster, tire blowouts or even lead to a crash. Don’t neglect and minimize the importance of pressure in car’s tires. To check tire pressure, you need to visit a service station, or you can buy a small digital pressure gauge for just a few dollars. If you are not sure which one to buy ask your mechanic, maybe he can recommend a brand he trusts the most. So, how to check tire pressure? The first thing you have to do is to check vehicle owner’s manual for recommended PSI (pounds per square inch). PSI is based on tire size, towing capacity and vehicle weight and size.If you have lost your user’s manual you can check on-line or you can look for the sticker with tire information usually in the driver’s side door jamb. Some vehicles have this sticker inside the petrol compartment. The sticker also has Gas or Diesel label under fuel type, you will find info about the PSI for rear and front tires. Remember, PSI recommendation can vary if the car is heavy loaded or when you are towing a trailer. Now when you know the proper tire pressure remove the valve cap and place pressure gauge. Wait until gauge measures the pressure. If you are using digital pressure gauge see readings on the screen. Compare readings with recommended PSI from manual and inflate tires using an air compressor or car portable air pump. If tire pressure is above the recommended simply press valve to let out some air.
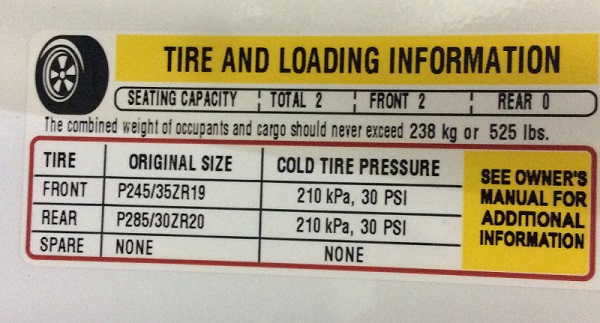
In last two or three years, many car manufacturers have included warning light on the dashboard that notifies the driver about low pressure in the tires. This is a very useful feature to have. Check owner’s manual, maybe your car has it, but the sensor is not working. If so, you need to visit an auto repair shop and repair it. Recommendation: To achieve accurate results it would be good to measure tire pressure when tires are cold, or vehicle is not driven more than a mile. If tires get deflated every day it is a sign you need new ones.
Reason: Poor Wheel Alignment
Solution Level: Intermediate DIY or Visit to Repair Shop: You need to take the vehicle to an alignment shop Cost: Get Quote Beside that you hear tires squealing or see uneven, sometimes rapid, tire wear you’ll notice that steering wheel is not centered when driving on the straight road. Sometimes you’ll feel vibrations. Many drivers said they noticed that fuel consumption was decreased when wheels were not aligned in recommended angles. If you notice any of these signs it is time to schedule wheel alignment and prevent further uneven tire wear and secure proper car handling in corners and straights.Symptoms: • tires squealing • uneven and rapid tire wear • not centered steering wheel • vibration on the steering wheel at highway speeds

What is wheel alignment and balancing anyway? Alignment is an adjustment of vehicle suspension. To keep wheel angles aligned as recommended, alignment has to be done not just on wheels but the whole system that connects vehicle and wheels. There are three types of alignment: two-wheel alignment, trust-angle alignment, and four-wheel alignment. The four-wheel alignment is most common. Three things are the main concerns for wheel alignment:
• Camber Go in front of your vehicle and inspect the wheel angle at the top. If the wheel is tilted in, toward the engine that is negative camber. If the wheel is tilted out that is positive camber. Propper camber reduces stress on suspension parts and improves tire life.

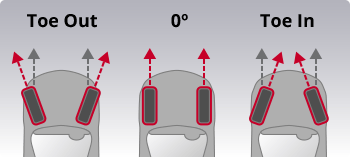
• Toe is the angle formed by a line drawn through the horizontal center of each wheel relative to the centerline of the vehicle. Both toe angles (toe in or toe out) require alignment since angle should be zero degrees or close to zero (straight ahead) unless you tend to do some drifting on the race track.
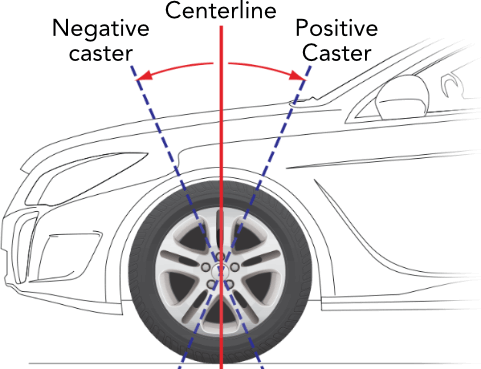
• Caster is a line drawn through the steering axis and then compared to vertical. If the axis is tilted back at the top, the angle (viewing from the side of your vehicle) is positive and vice versa. Caster improves stability, cornering and steering wheel return.
Wheel alignment cost will depend on vehicle you drive. Alignment for heavy pickup trucks cost more than alignment for a sedan. No matter the price it is more affordable to pay for good wheel alignment than to buy new tires. But it’s not just about tires, poor alignment can cause more serious problems with steering and suspension components. Thus, safety can be jeopardized too. Remember, there is no warning light that will notify driver about alignment issues. The driver is responsible for periodic and preventive checks – at least every 6 months or every 6,000 miles. Be responsible to yourself and passengers - ensure vehicle optimal drivability. After alignment, you need to do tire balancing too. Tire balancing refers to detecting any imbalance in tires weight and attaching a weight to compensate weight differences. Tire balancing will reduce tire wear, improve tire lifespan, result in smooth drive and improved performance. Extra tip: When searching for wheel alignment near you check for on-line discounts or Groupon deals. A lot of alignment shops offer a special discount or coupon codes that can save you some money.
Read More
- Motor Oil Explained
- GVWR - Definition, Purpose and How to Determine Gross Vehicle Weight Rating
- Towing Capacity Guide- Meaning, Goal, and How to Increase It
- Payload Capacity - How to Get Most Out of Your Truck
- CNG Cargo Vans: Eco-Friendly
- Fleet Management Software - Benefits and Best Solutions
- Why Buying Ex-Fleet Vehicles Is a Good Idea
- Pickup Truck or a Cargo Van
Sign #2 Car Loses Power
If your car needs more time to accelerate, with sudden lose of power, or you hear a strange noise under the hood first things to check are spark plugs. If all this is followed with low fuel economy, then it is certain that problem is with the ignition of the fuel-air mix.Reason: Spark Plug
Solution Level: Easy DIY or Visit to Repair Shop: Usually DIY Cost: Depends on the vehicle you drive Spark plugs are maybe small in dimension, but they are playing a vital role in vehicle’s engine. They are responsible for starting gas engines, diesel engines don’t have spark plugs, and they ignite or a light-up mixture of fuel and clean compressed air in the combustion chamber. Energy from combustion chamber moves pistons, pistons move crankshaft and that way the vehicle is moving. Don’t bother yourself with technical details, all important for now is that you understand that without spark plugs you can’t even start your car. Every gas-powered engine has one spark plug per cylinder. Some engines, usually high-performance, or V6 have two spark plugs per cylinder. How to change spark plugs? Hold on! Before you learn how to change spark plug you have to know what plugs are recommended for your vehicle. As always, check owner’s manual in the first place or check manufacturer website. Not all vehicles use the same spark plugs. Installing the incorrect plug can damage the engine. This is what you need to know when buying a spark plug for your car:- Car manufacturer and model,
- Year of manufacture,
- Engine and transmission type (2.0L, automatic for example),
- Fuel system – carburetor (older vehicles) or injected,
- Spark plug gap
- Genuine spark plug number.
Here is the simple step by step guide:
- Remove ignition coil from the plug
- Unscrew the plug with 3/8" ratchet,
- Gap the plugs with a gap gauge,
- Insert new plug into the valve. The gap should not be too wide or too small. Follow car maker’s recommended values,
- Put back ignition coil,
- Repeat steps for other spark plugs.
Symptoms of bad spark plugs:
- The leak of acceleration and performance,
- Vehicle runs on three instead of four cylinders,
- High fuel consumption,
- The engine is misfiring,
- Having trouble to start the vehicle,
- The engine idles roughly.
When to take the car to the pro? If you drive a car with standard 4-cylinder engine there will be no problems to change spark plugs on your own. These engines usually have easy access to spark-plugs, but some large V6 engines have hard spark-plug replacement procedure that requires disassembly of the intake manifold. In that case, it is better to drive your car to maintenance service. When to replace spark plugs? Replacement interval depends on mileage. Not all plugs have the same replacement interval. Some car makers recommend spark-plug replacement after 60,000 miles some even more. As usual, consult your owner’s manual. If you don’t know when you replaced them, pull them out and check the gap. Since this is not a big investment, replace spark plugs with the new one and write down a date to your notes or to car maintenance log. Who to trust? Best spark plugs on the market and trusted by millions of drivers in the US are NGK, Champion, Denso, and Bosch. Important to know: Vehicle can lose power due to problems with the central processor unit. It’s not wrong to say that modern cars are computers on wheels. For testing CPU, you need to have licensed diagnostic tool. It is usually software package installed on a laptop. To check vehicle’s CPU, connect laptop and vehicle by port under the dashboard. Since diagnostic tools and specialized software are expensive, drive your car to maintenance service and let the mechanic inspect vehicle’s computer.
Reason: Engine Air Filter
Solution Level: Easy DIY or Visit to Repair Shop: DIY Cost: Get Quote Along with spark plugs, engine air filter can cause serious problems with similar symptoms. Luckily, engine air filter is cheap and can be replaced very easy. You don’t need to be expert to change the air filter. Using just basic tools you can replace it in few minutes. Why is engine air filter so important? Can you run a marathon with a stuffy nose? No. Same goes with a car engine. Without clean air your car won't be able to accelerate as it should, fuel economy will be on the lowest level and it is very possible that it will cause damage to other engine parts. Filter’s main purpose is to make sure that air that goes into the engine is free of harmful debris. How to choose new engine air filter? Buy engine filter according to car maker’s recommendation or simply take old filter out and buy exactly the same one at a specialized shop. How to remove engine filter? This one is easy. The filter is placed into the plastic container (air filter box), has usually rectangular shape and it is connected to the engine intake manifold. Engine filter has an oval shape in engines that have a carburetor. Unclasp metal clips and open air filter box and remove the old filter. Place new filter in the box and snap the clips. It is recommended to change motor air filter once in every 10,000 miles or every 12 months. If you drive your vehicle in dusty roads or in hard conditions you can clean filter using compressed air every 5,000 miles.Sign #3 Car is Overheating
Reason: Engine Coolant Leaking
Solution Level: Easy to Moderate DIY or Visit to Repair Shop: Usually DIY Cost: Get Quote No matter if you own a driver license for a few months or for few decades you know how the right car temperature is important for optimal engine performance. Engine overheating and temperatures higher than recommended can lead to serious engine failure and repairs that can cost a small fortune. If you have noticed that engine temperature indicator goes into the red zone, stop the car, let the engine cool down and visit the nearest repair shop. Reasons for engine overheating are:- Engine coolant (antifreeze) leaking
- Thermostat or engine coolant sensor (ECS) is broken,
- Or water pump is broken.
Sign #4 Car Won’t Start
Reason: Drained Car Battery
Solution Level: Easy to Moderate DIY or Visit to Repair Shop: Usually visit to repair shop Cost: Get Quote Have you ever been in a situation like this? It is a cold winter morning and you just realized it’s your turn to drop the kids to the school before going to work. You turn the key and …. nothing. No sound under the hood. It’s like your car is dead. The battery is drained. You better call the cab. There are so many things that can affect the lifespan of vehicle’s battery. Maybe you forgot to turn the lights off or doors have been slightly opened the entire night and battery is drained. Sometimes the problem can be rust on battery terminals or loosen clamps and cables, or low battery fluid level. But most times the battery needs replacement because it’s old and is past its prime.Bad car battery symptoms:
- Engine cranks but it won’t start
- No lights and radio
- No roof lights and on the dashboard.
How to change your battery? To have a peace of mind drive your car to the repair shop and let professionals change it. They know how to test the battery capacity and make sure the problem is in the battery in the first place. The mechanic also knows what is a recommended battery for your vehicle in a terms of power (voltage), capacity and size. Some shops will install a new battery for FREE if you buy from them. If you, however, decide to do it on your own these are the steps to follow. But before we jump to replacing it here is a short car battery buying guide: choose battery size or group, check CCA (cold cranking amp) or ability of the battery to start vehicle in extreme cold weather, check reserved capacity, look for strong warranty, decide on lead-acid battery or absorbed glass mat (AGM), and finally choose maintenance-free battery. Don’t buy a battery with much lower CCA rating recommended by the vehicle maker.
When to change car battery? It is recommended to change the battery every 3 years. Battery lifespan is usually from 2-6 years but depends a lot on climate and driving habits. Remember, cold weather is battery the worst enemy. Best car battery? There are a lot of good brands, Bosch, Duracell, Autozone, DieHard, Ever Start, Duralast, and AutoCraft are just some of them. Pro advice for long battery life: Never leave lights on, check battery fluid level in every cell, don’t forget to close the doors when car is in the garage or parking, during cold weather try to use car as much as possible or at least start the engine and let it work for several minutes, try to avoid brief trips.
- Locate the battery; In most cases, the battery is under the bonnet. Some vehicle, heavy-duty pickup trucks, and SUVs have batteries under driver and co-driver seat
- Now remove battery terminals; Positive terminal has + sign (black color), the negative terminal has – sign (red color). Always disconnect the negative terminal first. To loosen cable clamp you need a wrench (8mm or 10mm).
- Remove old battery; Some batteries, especially those on SUVs and trucks with diesel engines, are big and heavy. It would be good to have some help here.
- Clean the terminal clamps; Use a wire brush and remove corrosion. You can use anti-corrosion spray like WD-40. Leave for a few minutes to dry or dry with clean cloth.
- Place the new battery in the slot and remove plastic caps;
- Reconnect terminals. First to reconnect is the positive terminal. Tighten the clamps using a wrench. Do the same with the negative terminal.
- Now start the car and make sure everything works fine;
- Don’t forget to recycle your old battery!
When to change car battery? It is recommended to change the battery every 3 years. Battery lifespan is usually from 2-6 years but depends a lot on climate and driving habits. Remember, cold weather is battery the worst enemy. Best car battery? There are a lot of good brands, Bosch, Duracell, Autozone, DieHard, Ever Start, Duralast, and AutoCraft are just some of them. Pro advice for long battery life: Never leave lights on, check battery fluid level in every cell, don’t forget to close the doors when car is in the garage or parking, during cold weather try to use car as much as possible or at least start the engine and let it work for several minutes, try to avoid brief trips.